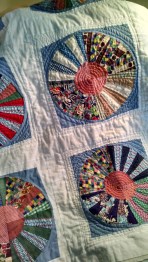
The hand quilting on the vintage project is coming along nicely, what with our long Michigan evenings. Retirement finds me quite content to while away the hours with fabric in hand. The vintage quilt ended up having nine squares, consisting of four fans put together to create flowers. I am now quilting the eighth one, and, when the ninth is finished, will begin work on large-stitched vines in the borders, to help it blend with it’s surroundings when it reaches it’s home (the “She Shed” of a special friend).
The machine sewn project, which has been keeping me b usy most recently, is a “Mystery Quilt” project, organized by Midland Quilters Squared, to which I belong. Each month we were given a segment of the directions, until this month, when the final diagram was revealed. This has been a challenge for me, as piecing is not my favorite style and I am not given to perfectionism, so this has been a good stretching exercise for me. Somehow, it has resulted in a gallon sized baggie full of extra squares and triangles, so I obviously misunderstood a direction along the way. It was a happy day when it all came together this week. Here is a closer view that also gives a better ideas of the colors. (Pale sky blue and raspberries)

Finally, the other technique tried since moving from the busy holidays into hibernation mode, was inspired by a class taught by Tawni Young from Interlochen, Michigan. This was totally fun and a process that allows completion of a small landscape quilt in a day. I believe it is termed “confetti quilting”, as you begin by shredding piles of several colors of fabric, using a rotary cutter. The results are then sprinkled onto batting topped backing fabric. Trees, etc. are then layered on with embroidery floss branches in places. When happy with the result you cover all with black tulle and begin quilting. The trees and any other large objects are outlined first, and you then just enjoy lots of free-motion quilting all over the rest, to hold everything together. Tawni often puts hers in a frame, but here is my first attempt.
A new art quilt was started today. More on that in the future.


