Category Archives: Uncategorized

Winter’s Work, Put to Rest

Here in Mid-Michigan we experienced a relatively mild winter, but it has been very reluctant to leave.  That meant a lot of days when quilting was a very appealing activity, and all the projects destined for the Midland Quilter’s Squared Quilt Show, held last weekend, were completed in time:

Below is the completed Mystery Quilt, composed of many more tiny squares than have ever crossed my table before for a project.  Fortunately the errors aren’t too visible from here, and it makes me happy that my granddaughter, Isabella, is looking forward to receiving it.


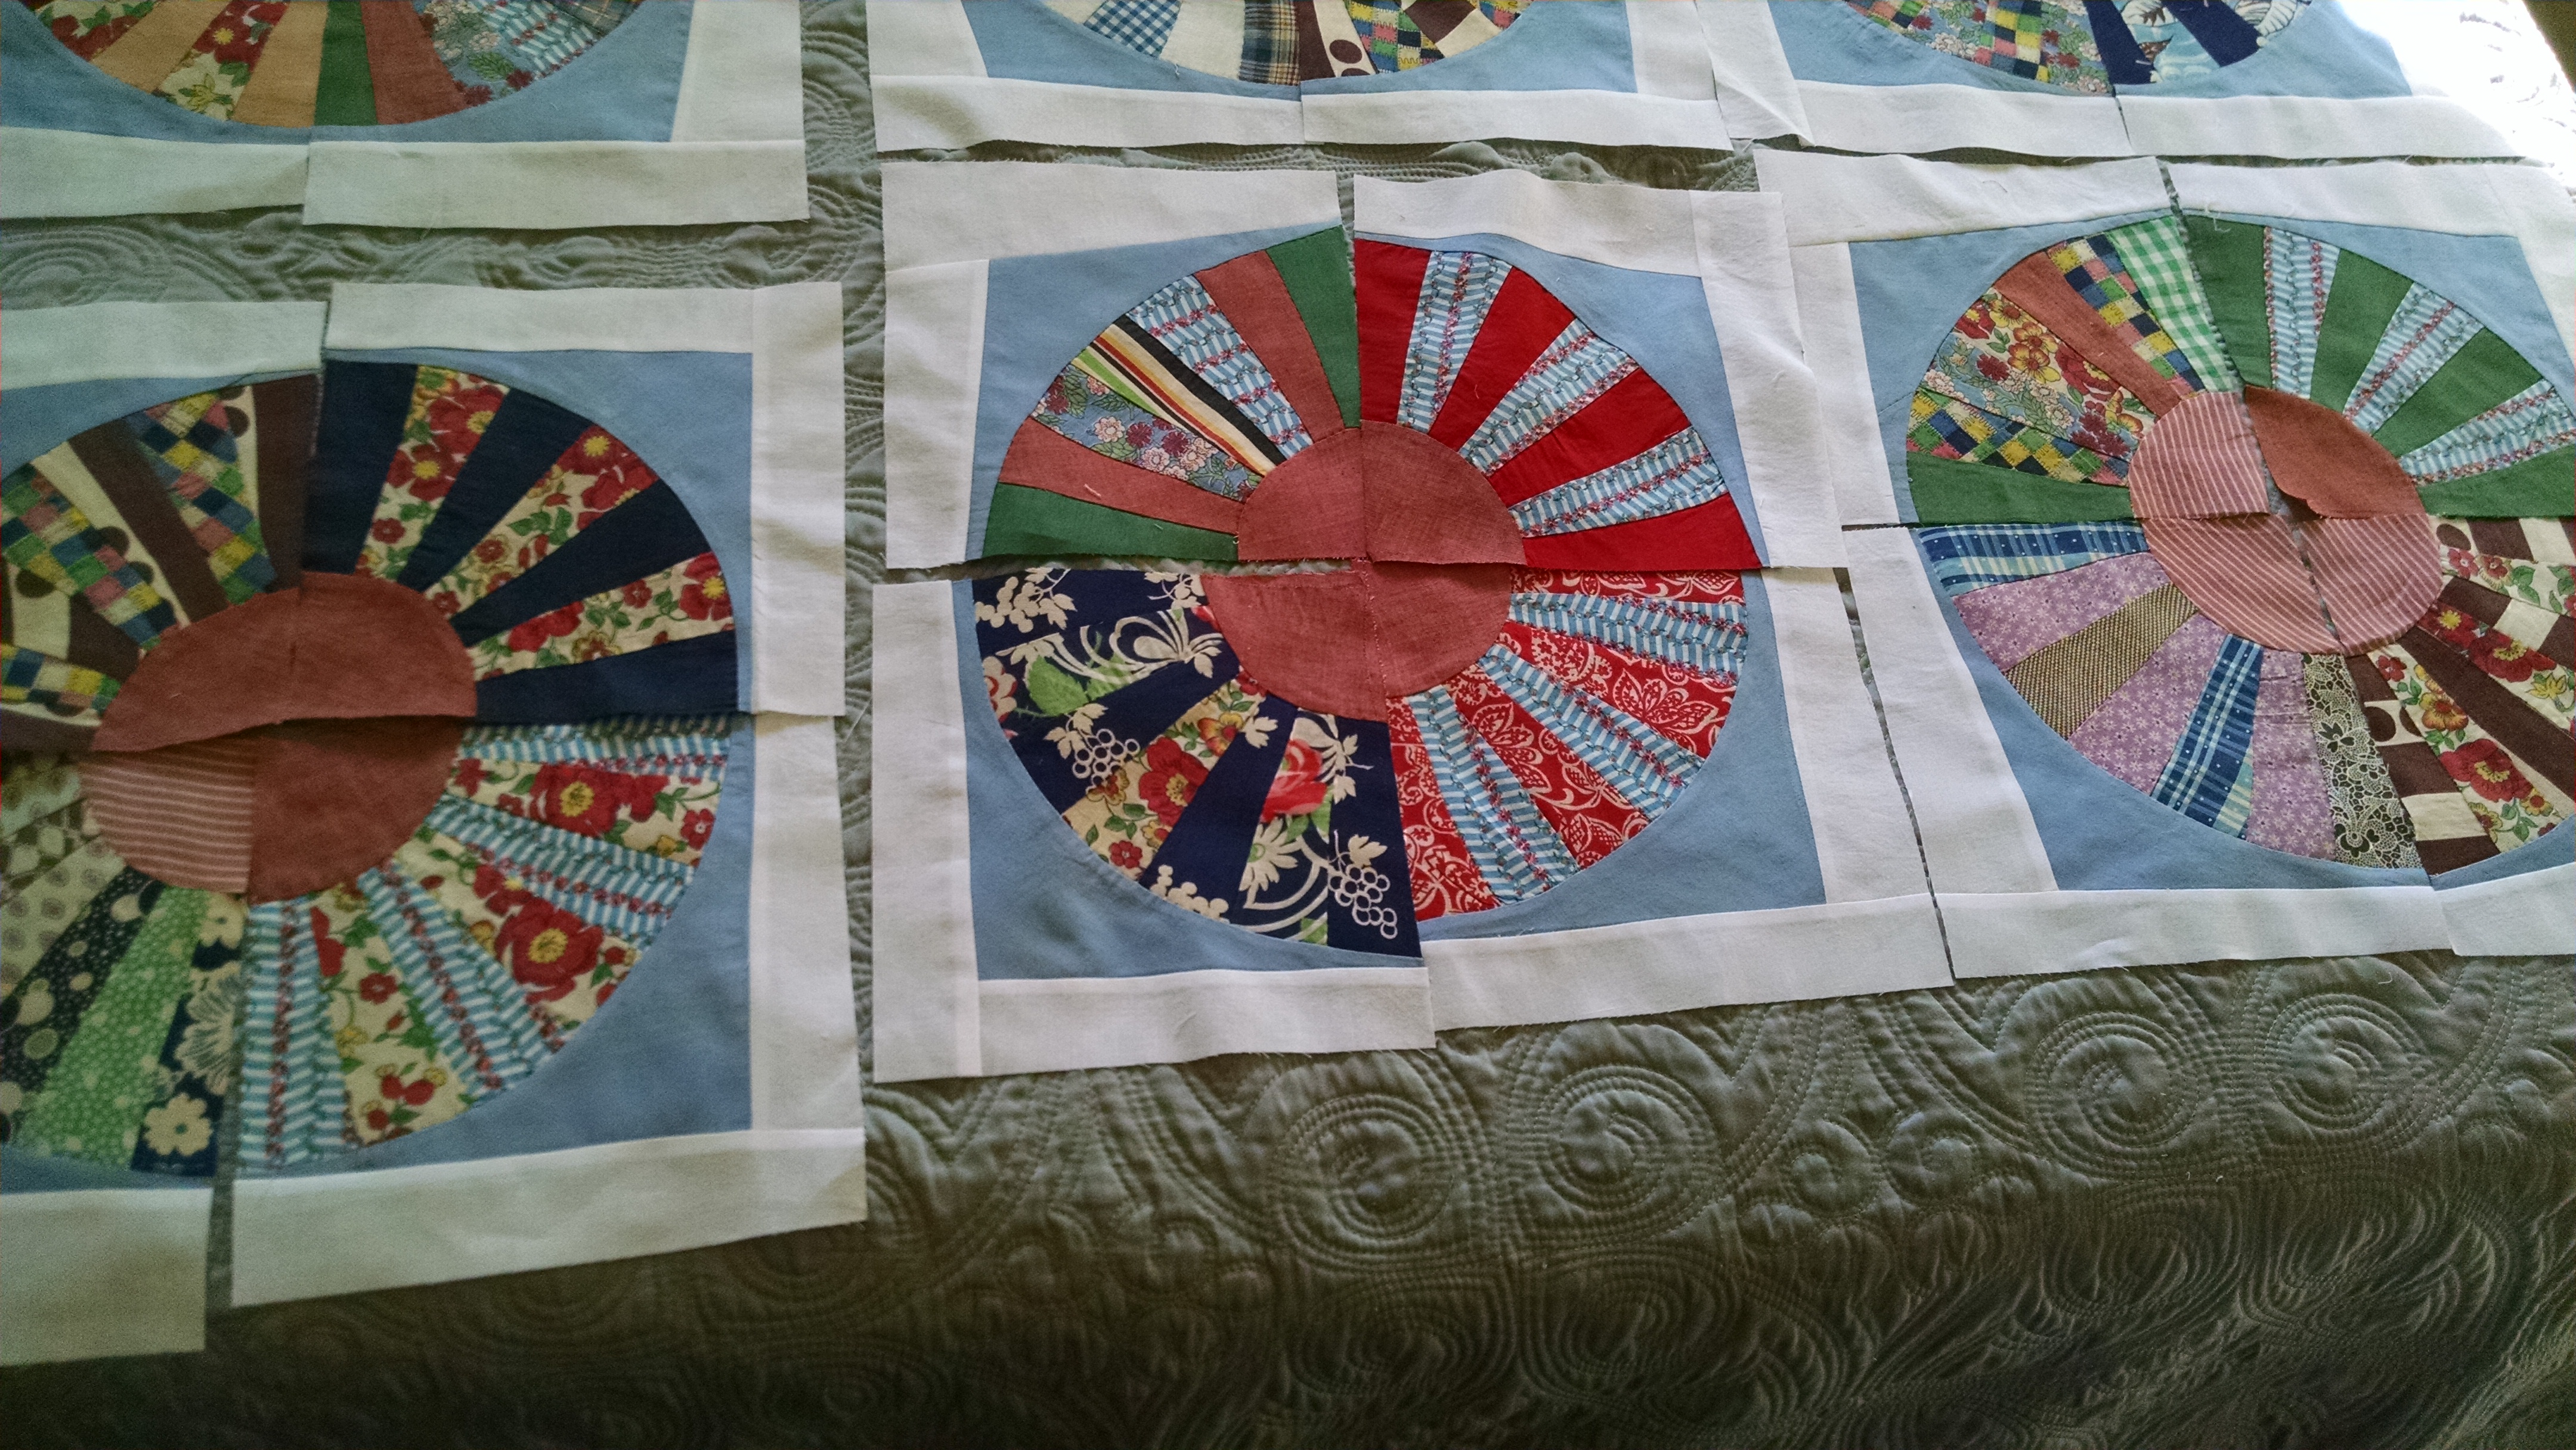
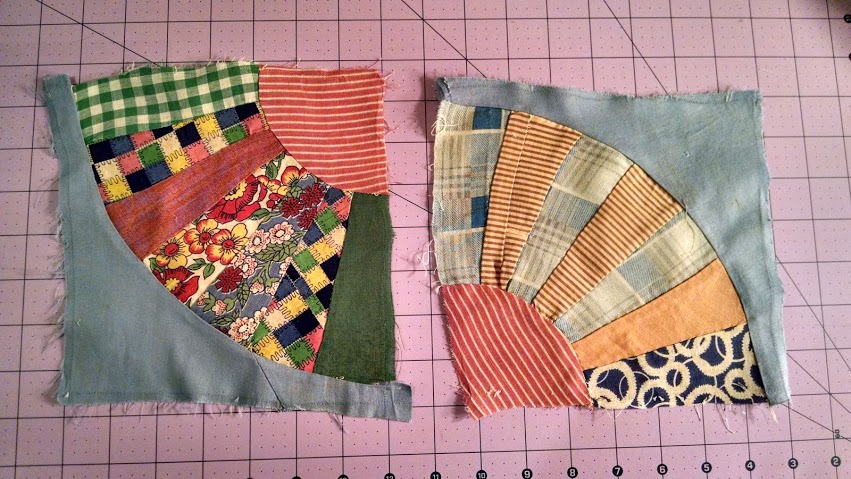
This is a photo of another project I posted on earlier.  The blue fan squares were part of a 1930-40 quilt top which was quite misshapen and had never been finished by its creator.  The blocks were taken apart and reconstructed into flowers.  White sashing and borders were then added and I spent the entire winter hand quilting it during the long evenings.  The idea came from a presentation by Tim Latimer, but, unlike Tim, I am not very fast.

328

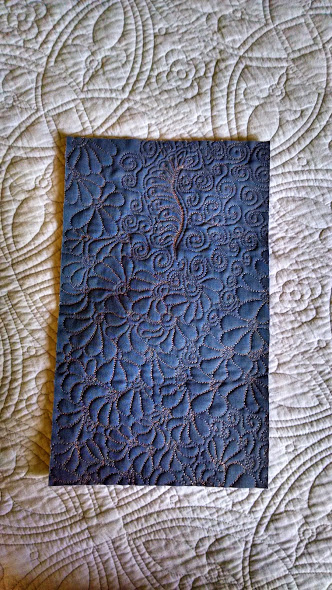
The last photo is a small wall hanging, done for this years quilt show challenge.  We were to base our piece on a song.  This one was inspired by “Swing on a Star” written for Bing Crosby.  “Would you like to swing on a star…Carry moonbeams home in a jar…”

Swing on a star

So, at last, gardening time is approaching and I have lots of smaller projects on the way.  Happy May!


Advertisement

Vintage Quilt Remake Progress

Quilting has been a daily event most of the week, as I finish up a few projects and continue to work on this one.  I finally have a project together that will hopefully keep my hand quilting skill intact through the long winter evenings.  It is a peaceful, relaxing activity at the end of the day.

Here is the previous photo of the quilt as it arrived.Vintage quilt on arrival

As you can see in the photo below, I have used 36 of the original 100 blocks, so I’m sure these will appear here again some day.  It measures about 58″ square, which will make a nice sized lap quilt for the garden.IMG_20151109_175859

After taking the original squares apart from each other, I squared up the corners with the quarter circles and added white borders to make each 8 1/2 “.  The fans were then arranged in circles, which was a bit like assembling a puzzle, as thy were irregular in size.IMG_20151107_102402687

Once this was accomplished and they were sewn together, they were attached to each other with 2″ borders and another 2″ border surrounds the whole thing.

It goes into my hoop tonight, which means it might be done by the end of the winter…maybe.

Restoring a Vintage Quilt – And So It Begins

Vintage quilt on arrivalAwkward vintage blocksThis beautiful old quilt top arrived in the mail about ten days ago.  As is the case with many of these old quilt tops available on e-bay, the quilter found that it wasn’t quite square and she never got around to quilting it.  Because the squares were so irregular, and because of the influence of Tim Latimer  (see timquilts.com), I decided to separate the blocks and make the quilt my own.  Above are two average blocks, to illustrate the irregularities.  Below is a shot of the back of a block, to show the hand work.

Pretty handwork

As I take the blocks apart I am pressingthem, squaring the corner with the fan, and trimming the other two sides in whatever straight line works.

vintage ready to square

I am now past half done with this chore.  Aren’t these old feed sack (?) prints pretty?

Pretty vintage block

White will be added to square them all out, so I had to try a couple to see how they looked.

Completed vintage block

It’s all a bit tedious as the squares were machine stitched, but I do think the result will be worth it.  Stay tuned.  Meantime I’ll also keep posting the other projects that are currently entertaining me.

Too Many Coffee Breaks

Paper Pieced Coffee Quilt

Believe it or not, I actually do quilt almost every single day.  Blogging about the work as I go, however, has not been my strong suit.  Maybe if I bring this quilt to my PC for coffee breaks, I could write a few lines about what I am working on daily.

You may have noticed that I don’t have a lot of interest (or ability, for that matter) when it comes to piecing by a pattern. It is exciting to me to try many different techniques, with the expectation that some trend will develop in my quilts, but thus far that hasn’t happened.  That being said, I am currently working on a quilt club “Mystery Quilt” which is involving hundreds of little pieces, which may (or may not) evolve into a neat, precise whole.

Also in the works, thanks to Tim Latimer  (see timquilts.com)  is a redesign of a vintage quilt top rescue.  I am still in the process of deconstruction, but have a plan in mind.  More on that later this week.

The third project in the works, which will also appear in days to come, is a baby quilt, designed in the black, white and bright colors that are of the most interest to infants.

So back to my Coffee Break Quilt.  I found a free paper-pieced pattern for the coffee cup on Pinterest, selected colors that make me happy, and surrounded the blocks with those colors in solids, to give me a nice background for machine quilting.  The backing is flannel, to make it a nice cozy quilt for actually curling up with a hot beverage.  Here’s a close-up, for a better look at the quilting.

Coffee Break detail
Coffee Break detail

Design Your Own Wallet

finished wallet

Summer is drawing to an end and I must return from the long vacation I gave myself from blogging.  The quilting has continued throughout, of course, so there is plenty to talk about.

This post is largely intended to inspire you to create your own custom utilitarian items, using your quilting skills.  You will see the insight to be gained from such projects.  In attempting my first wallet, I considered what I want to have with me, so that I am free from a larger purse.  In my case, that is ID, space for credit and reward cards, cash and my smart phone.  I wished to have a handle so that my hands can be free when shopping.

As the phone was the largest item, I calculated the finished size based on it’s dimensions X 3, and made a quilt sandwich about an inch larger all around, to allow for fabric covered by binding and that taken up by the quilting.  After quilting, it looked like this:Wallet quilting

I used one fabric for my wallet, but this would also provide an opportunity to be creative.  Keep in mind that you will eventually have to sew many layers together, and avoid extra seams at the edges.  The batting provides some extra protection for my phone, but you could use something with less weight if your machine has trouble with many layers.

One end was then folded up, for the phone pocket, and fabric was accordion folded and sewn to the outside of the pocket in a way that fit the number and size of my cards.  (See below)

Wallet prep 4

(In designing your own wallet, it might make more sense to arrange the card pockets on the side opposite the phone pocket, to create fewer layers.)

The handle loop is added at this point.  I used a detachable fastener purchased at JoAnn Fabrics, I created the handle and loop at the same time by folding in raw edges on the long side and stitching.  I then cut off a piece long enough for the loop on the wallet itself and attached it now.  Here is a view taken after the binding is added (unfortunately).  It does show that I chose to put it on the inside so that it is concealed at times I am not using the handle.

Fasten detail

So there we have it.  Add binding all the way around and you are finished.  As you can see, there is nothing precision needed to design your own items, just a willingness to experiment and come up with an item that meets your needs and can be adapted for gifting.

A Place to Practice

My modest sewing corner.

As I was leaving my last free-motion class, a fellow student commented to me that she found it hard to find 10 minutes a day to practice. Now, I’m so excited about the process that I could hardly relate, until I realized that it is much different if you have to drag all of your supplies out each time you work. It was just this year that I created a space in the corner of my basement. I had a craft spot there since moving in, but only used it for really messy projects because the basement is an unappealing storage space. Having a quilting and sewing spot is entirely different, however. Once facing a blank wall with the fabric surrounding me and my project before me, I am lost in my own world. And the big difference is that I can now work for short periods that I wouldn’t have considered if I had to set everything up.

Now I just need to work on that blank wall. I have some ideas perking.

Teaching a Friend to Quilt

IMG_20140220_151303644 copy

Soon after becoming serious about quilting, myself, a friend asked for assistance in making a queen-size quilt for her bed. This sounded pretty daunting to a beginner, but after a little research we came up with the method shown above.

We created 10 inch squares using randomly cut strips. (No piecing to cut!) We then added a layer of batting and quilted each square in 3/4 inch lines. Using the number of squares she desired to create the size she wanted, we laid the squares out in a pleasing pattern, then stacked them up, labeling the rows for assemble. We sewed the squares into vertical rows, then began to assemble. She chose a queen-size sheet in white as her backing and we folded it in half vertically and ironed it, to find the center. We then placed the center vertical row in relation to the center line, turned it face down, and stitched from the center to the edge of the quilt in each direction, to attach it to the backing. In this manner, working from the center out, we attached each row in succession. We were then able to turn the whole thing over and do a bit of extra quilting by stitching in the ditch from the center out. (Not a lot is required, as the batting is already well attached, but at least you will want to go between the blocks horizontally.) Once again, we had to work from the center out. We finished with a traditional binding in the green polka-dot print.

My friend assembled pillowcases and decorator pillows from remnants and was pleased and excited by her very first quilting experience!